Monday 26 November 2012

Braised pork ‘chop’ with crispy cheek, scratchings, roasted beetroot, celeriac puree and a maple syrup sauce

Today I have had another day off, and it was the perfect opportunity to make a dish that I’d had in my head and had been looking forward to making for a while. I had really wanted to make something nice with pork for a while, particularly involving pork chops and the cheeks. I have had chops a few times in the last few months, but although each time had been delicious, I had failed to get it quite right with the flavour combinations. It’s always difficult when trying to create dishes in your head, as it’s never guaranteed that they will turn out as good as imagined!

Pork is such a versatile meat, and at a time when meat prices are rocketing, is still really reasonably priced. The main thing with buying pork is getting good quality, well reared meat. Although there has been a spotlight on pork welfare standards in recent years, loads of dodgy stuff still gets through to the supermarket shelves, and it really does have an impact on the taste of the finished meal. You only have to look at pork in a quality butchers to see the difference; the colouring is so much richer, and far less waterlogged and anaemic. It actually looks like it has come from a living animal! And the thing is, you don’t even need to spend that much more to get better meat. The first time I bought a chop from the butchers I was astounded; it was massive, and put all of the thin chops on the supermarket shelves to shame. 


Recently I have heard loads about using pork cheeks and have been very interesting in using them myself. Now this is the most budget of all pork cuts, and the two free range cheeks that I bought for this recipe came to a massive 66 pence. Like all hard working muscles, they need a lot of slow cooking a patience, but once ready offer the most tender and flavoursome meat. In this recipe they add another element to the pork, with a different taste and texture to the chop and the scratching. 

Pork goes fantastically well with sweeter things like maple syrup, beetroot and apple, but you need to be careful to balance out the sweetness. There’s nothing like having a lovely meal in front of you ruined by a really sickly sweet sauce. The key is to keep tasting as you go, and add the sweet ingredients in moderation so that they can be controlled. 

Although there are loads of elements in this dish, you can make most of them in advance, and have them ready to be heated up when the meat has been cooked. I haven’t added potatoes to this recipe as there is quite a lot of meat on the plate, and it might make it a bit heavy. However, you could easily add some roasted potatoes, or a gratin if you so wished. 

Serves 2

Ingredients: 

For the chops: 

2 thick pork chops, around 1 1/2” thick
1 fennel, sliced, fronds saved
1 carrot, roughly chopped
1/2 leek, roughly chopped
2 cloves garlic, skin removed
5 sprigs thyme
200ml dry cider
20g butter

For the cheeks:

2 pork cheeks
1 litre chicken stock
1/2 leek, roughly chopped
1 carrot, roughly chopped
1 fennel bulb, roughly chopped, fronds saved
1 onion, roughly chopped
3 garlic cloves, skin removed
1 bay leaf
8 peppercorns

1 small handful panko breadcrumbs
1 egg, beaten
100g plain flour
1 tsp wholegrain mustard
20g butter, melted
1 litre of vegetable oil, for frying

For the sauce:

1 shallot, finely chopped
2 garlic cloves, skin removed
6 sprigs thyme
The bones and trimmings from the chops
100ml brandy
4 tbsp maple sypup
1 bay leaf
1 star anise
30g butter

For the celeriac puree:

1/3 celeriac, roughly chopped into 1” pieces
3 tbsp double cream
20g butter
2 thyme sprigs, leaves picked

For the roasted beetroot:

2 large beetroots
2 garlic cloves
5 sprigs of thyme
Olive oil

For the scratchings:

The skin and fat from the outside of the chops, sliced into long, thin pieces
Sprinkle of salt

2 slices of streaky bacon
1/2 Granny Smith apple, sliced into small dice
1/2 lemon, juice only


First put the cheeks on to slow cook. Put the cheeks into a large saucepan with the stock, leek, carrot, fennel, onion, garlic, bay leaf and peppercorns. Bring the stock up to the boil, then turn the heat down to low, cover, and cook for 4 hours. When the cheeks are falling apart and tender, turn the heat off and allow to cool in the stock. Drain the saucepan, keeping the liquid in a bowl, and discard the vegetables. Put the cheeks in a small bowl and shred apart. Add the mustard, melted butter and season well. Mix together, taste and adjust. Put in fridge to cool for 20 minutes. 


To turn the cheeks into croquettes, put the flour onto one plate, the panko onto another and beat the egg in a small bowl. Season all of the elements. Take the cooled shredded cheek mixture out of the fridge and make two small golf ball sized balls, compacting them in your hands. Carefully coat the balls in the flour, then dip them into the egg before rolling them in the panko, making sure they get totally covered. Repeat the egg and panko process with each, then put aside for cooking later. 


Heat the oven to 210ºC (fan)

To make the scratchings, trim the outside skin and fat from the chops, and cut into long pieces about 1cm wide. Put the fat pieces onto a lined oven tray, sprinkle with salt and put into the hot oven for 15-20 minutes, or until crispy and golden. Set aside.


Lower the oven to 200ºC (fan)

Put the streaky bacon onto a lined oven tray and cook in the oven for 10-12 minutes, or until crispy and brittle. Remove, drain and finely chop. Set aside.

Lower the oven to 180ºC (fan)

Put the whole beetroot into a small oven dish and add the thyme, garlic and seasoning. Drizzle over a little olive oil and mix well to coat everything. Cover with foil, and put in the oven for 1 hour. 


To cook the chops, trim the bone and fat away so that you are left with the loin pieces. Keep the scraps and bone for when you make the sauce, but throw away any excess fat. Heat up a frying pan to a medium-high heat. Rub some oil into the loin pieces and season well. Fry in the hot pan for a couple of minutes on each side, then add the butter and quickly baste the pork until it is a golden colour. Pour in the cider and bring to the boil. Put the carrot, leeks, fennel, garlic and thyme into a deep oven dish, and nestle the browned pork amongst this. Pour over the pan juices and top up with some of the stock left over from the pork cheeks until the liquid goes 2/3rds of the way up the sides of the pork (make sure you save 500ml for the sauce). Put into the oven uncovered for 45 minutes.

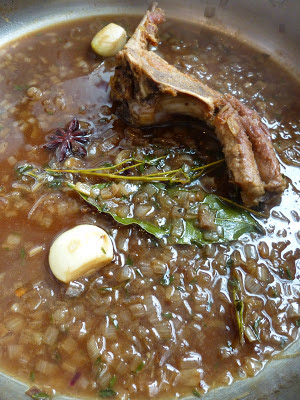
To make the sauce, heat up a little oil in a large frying pan to a medium-high temperature. Fry the bones and trimmings of the chops and cook until well browned on each side. Add the shallot, garlic, thyme and bay and cook for another couple of minutes until golden brown. Pour over the brandy and flambe, then add 500ml of the leftover stock from cooking the cheeks. Add the star anise and maple syrup and season well. Let the liquid bubble away and reduce until there is about 150ml left, about 20 minutes. Strain the sauce and return the liquid to a clean pan. Taste, adjust and set aside until the meat is ready.


For the celeriac puree, heat up some salted water in a saucepan until boiling. When the water is hot, add the celeriac and boil for 8-10 minutes or until tender. Drain the water away and tip the celeriac into food processor along with the cream, seasoning, thyme and butter. Blitz until very smooth. Pass the mixture through a fine sieve to remove any lumps. Taste and add seasoning if needed, then transfer into a small saucepan to be reheated later. 

Pick the fennel fronds from the leftover bits of fennel and set aside. Cut some thin slices from the apple and finely dice them. Put the small pieces apple into a bowl and squeeze over the lemon juice to stop from browning. 

When the meat has cooked, take out of the oven and put the pork onto a plate to rest for 10 minutes.

When the beetroot is ready, carefully peel off the skin, trim the top and the bottom and cut into a disc with a round cutter. 


Put 1 litre of vegetable oil into a large saucepan and heat to 150ºC. Carefully lower the breadcrumbed cheek balls into the hot oil, and fry for a few minutes until golden brown. Remove and drain on kitchen paper. 

Heat up the puree and sauce in separate saucepans. When the sauce is hot, add the butter and stir well, before having a final taste and season. 

To plate up, put a tablespoon of the puree onto each plate. Add the cheek croquette, the rested ‘chop’ and the roasted beetroot disc. Place a couple of scratching on top of the beetroot, and sprinkle some of the apple, bacon and fennel fronds onto the pork. Spoon over some of the sauce and serve.

Tuesday 20 November 2012

Mussels with ‘nduja broth, butter beans and tarragon


Here I will carry on from my last blog post with the actual meal that I intended to cook in the first place! Before I got sidetracked into buying the prawns, the main reason that I went to Borough Market at the weekend was to buy the ‘nduja to make the sauce for my mussel broth. You can buy the rest of the ingredients from most fishmongers and greengrocers, but I have travelled to loads of Italian delis around Stoke Newington and couldn’t find it anywhere. I always try and find my ingredients as locally as possible, and if I fail with that then I know that I can get pretty much anything from Borough, even though it is a bit of a trek from north London. From researching on Twitter, I knew that there were stalls that sold the soft, spicy salami from southern Italy, and luckily I managed to stumble upon one really quickly. The guys at the De Calabria stall were very friendly, and I was happy to have found what I had come for. 


In the past I have used sombrasada, which is a soft chorizo from Spain, and very similar to the ‘nduja in texture. However, the ‘nduja carries a much meatier and savoury flavour, with a much spicier kick than it’s Spanish equivalent, which I thought would work really well with the cider broth and the mussels. I’ve still got a big chunk of the stuff in the fridge, and am always so tempted to slap it on some crusty bread when I stumble back from work hungry. Aside from this broth, it will work really well in giving backbone and depth to soups and sauces, and I can’t wait to have it with some fresh pasta. As it’s strong and spicy, you only need a tiny bit to make an impact; a little definitely goes a long way.

I’m surprised that it’s taken me this long to write about mussels in this blog, as they are right up there with my favourite seafood. I started eating them on holidays with my parents cooked with white wine, cream and garlic and haven’t looked back since. Although I still love moules mariniere, or even better, moules frites, there are so many more ways to cook mussels. They handle big flavours really well, so using things like ‘nduja, cider and paprika is no problem. The key is in the preparation and cooking of the mussels. Always buy fresh live mussels from a good fishmonger in the months when they are in season. Make sure you de-beard them, and while you do this, discard any mussels that are broken, or that don’t close when given a sharp tap. They only need to be quickly steamed, otherwise they go very rubbery and won’t be nice! If you haven't already, I urge you to give them a go. They are also really sustainable and excellent value for money, which can only be a good thing.


To give my sauce even more flavour and a little sweetness, I used the leftover shells from the prawns that we had eaten as a starter. You could see if your fishmonger has any spare, but this is not totally essential, and the sauce will be lovely if you don’t have the shells. 

Serves 2 as a main, or 4 for a light lunch or starter.

Ingredients:

1kg live mussels, de-bearded and cleaned

3 shallots, finely chopped
1 red chilli, finely chopped
1 carrot, finely chopped
1 fennel, finely chopped
2 garlic cloves, finely sliced
1/2 tsp hot smoked paprika
1 tsp tomato puree
75g ‘nduja, skin removed and roughly chopped
1 small pinch saffron
1 bay leaf
1.5 litres good fish stock
250ml dry cider, I used Black Fox organic
1 splash brandy
Shellfish shells (optional)

To finish:

400g butter beans, pre-soaked or tinned and drained well
1 large handful small cherry tomatoes, halved
5 sprigs tarragon, leaves picked and roughly chopped
1 lemon, juice only
A few rocket leaves

To serve: 

Soda bread and butter


Heat up a large saucepan or skillet to a medium heat and add a little oil. When up to temperature, add the shallot, season and cook for a couple of minutes until soft. Add the fennel, carrot, garlic, chilli and paprika and cook for  5-10 minutes until the vegetables start to become tender. Stir in the ‘nduja, saffron and tomato puree and cook for another couple of minutes, so that the ‘nduja dissolves into the sauce and the puree has cooked out. If you are using the shellfish shells, you can add them at this point too and saute. Turn up the heat slightly and pour over the brandy and carefully flambe, burning away all of the alcohol. Add the cider and reduce by half, then top up with the fish stock and bay leaf. Bring to the boil before turning the heat back down to medium and seasoning well. Cook uncovered until the liquid has reduced by about two-thirds, stirring occasionally. This reduction process should take around 30-45 minutes. 


When the mixture has reduced, strain the liquid through a sieve into a bowl, pushing down on everything to make sure that every drop of liquid and flavour goes through. Discard the vegetables in the sieve and put the strained sauce into the cleaned saucepan. Heat the sauce back up and when simmering, add the drained butter beans and cherry tomatoes. 


Turn the heat up, bring the sauce back to the boil and add the prepared mussels. Cover the saucepan and give it a shake. Keep the pan covered and cook for 4-5 minutes, or until all of the mussels have opened. When the mussels are cooked, remove them from the pan and set aside. Stir through the lemon juice, tarragon and seasoning before tasting and adjusting. 


To plate up, spoon some of the sauce, beans and tomatoes into a bowl and then add some of the cooked mussels. Top with a little rocket, a drizzle of olive oil and serve with some crusty soda bread and butter.

Monday 19 November 2012

Giant prawns


A nice and quick one this, as it’s less of a recipe and more of show of great ingredients. 

Last weekend I had a quick after work trip to Borough Market with Katie. It had been a really busy week, and the thought of drifting around a bustling market with a steaming cup of something mulled was too good an opportunity to refuse. As I work on Saturdays, I hardly ever manage get down there so couldn’t wait to get back! 

Over the past few weeks I have been trying to eat a bit more sensibly, mostly cooking up big vegetable stews and soups in an attempt to get in a bit better shape and hopefully save some pennies in the process. I even went as far as promising a friend one drunken night that I would go through the whole of November as a vegetarian, declaring that I could do it with ease. Obviously that didn’t last long. I have generally been good though and I have enjoyed feeling a little bit healthier because of it. I am the sort of person that could eat a good soup or stew every day of the week, so I plan on carrying this on a little longer. However, this doesn’t carry over to weekends, and it’s always so tempting to pig out. 


I had intended to be quite thrifty at Borough too, and it was the perfect chance to get some hard to source ingredients for a meal that I had been meaning to make. Sitting in the park in the cold on my lunch breaks in the week had made me crave warming bowls of mussels with a rich and spicy sauce with cider, tarragon and ‘nduja. The only problem with this is that when you are at Borough, you are surrounded by amazing quality produce and it is so easy to go a bit crazy and buy things by ‘accident’. This occasion was no different, and especially after a mulled cider as the first meal of the day I was a sucker. As I went to buy the mussels that I needed from the large fish stall in the central market, Katie pointed out the massive Madagascan prawns, and in a rash moment I pointed at those as well. 

I had often seen these prawns and wanted to buy them, but mostly I reason that they are too expensive, potentially unsustainable and I’m also not too comfortable with the amount of air miles involved in getting them here. That’s not to say that I only use local ingredients, I don’t, but in the case of the prawns I often just think that there is something better that I could buy from closer to home. However, at that point on Saturday I found those prawns in my bag, and I was quite excited about eating them.

I only had one method of cooking them in mind - fast and simple. When you spend that much on such special ingredients you want them to speak for themselves. Garlic, chilli and lemon go amazingly well with prawns, and the smell and taste of the freshly grilled prawns made me feel like I was on holiday, ripping the shells off whilst sitting at some Mediterranean harbour. If you like you can use the same methods with prawns of any size, just adjust the cooking time to suit. I used a grill, but had this have been summer, a bbq would have been my first choice. 

Serves 2

Ingredients:

6 large prawns, shells left on
1 small red chilli
1 large garlic clove, finely chopped
3 tbsp parsley, finely chopped
1 lemon
1 tbsp olive oil
Salt and pepper

To serve:

Good quality mayonnaise, preferably homemade
1 lemon
Salt and pepper

Turn the grill up to high.

Mix the garlic, chilli, parsley, lemon juice, olive oil and some seasoning together in a bowl. Toss the mixture through the prawns, and arrange them on a flat baking tray. 


Put the prawns under the hot grill and cook for 3 minutes, then turn over and cook for another 3 minutes, or until the shells have turned pink and are sizzling away. 

While the prawns are cooking, mix a few tablespoons of mayo with the juice of half a lemon and some salt and pepper. Taste and adjust. 


When the prawns have cooked, squeeze over the other half of lemon juice and sprinkle over a little seasoning. Serve with the mayo and tuck in!

Tuesday 13 November 2012

Salmon three ways with horseradish cream, pickled radishes and crispy skin


Sometimes when I have a day or an evening when I am in the house on my own, I like to go to town on what I eat and make myself a ridiculously over the top dinner or lunch for one. I have no pressure to put a meal on the table and can take as long as I like, which often means eating at around 10pm after my overambitious cooking has ran away with the time. But sometimes it can be quick and easy, and I am left content and that the effort was all worth it, albeit dreading all of the clearing up... This lunch was one of those easier ones, mostly due to a bit of forward planning that made a lovely dish quite quick to assemble.

I’ve wanted to have a go at curing salmon in beetroot ever since watching Nathan Outlaw make it on Saturday Kitchen a few months back, and at the weekend I had the perfect excuse to give in a try. Katie and I had made sushi on the Saturday night, and I had bought a little extra salmon while I was there. I sometimes get a bit overexcited at fishmongers, and often walk away with a few extra bits that I couldn’t refuse. Come the Sunday I decided that curing would be the way to go, and although it might seem like a pain having to prepare it in advance, it’s hardly any work at all when you get down to it. I replaced the tarragon used by Nathan with garlic, bay and thyme, and after patiently waiting for my salmon to cure, the results were spectacular. After 20 or so hours in the curing mixture, the salmon is almost candied with a glowing red outer, turning into firm dark orange flesh when sliced. The taste is slightly salty, subtle salmon with the sweet hint of beetroot. 


This would have been a great little lunch on it’s own, or in a sandwich with horseradish and watercress as I made Katie the next day. But for this recipe I really wanted to make something special that championed salmon, and the pate and tartare were very quick ways of achieving this. 

The key to all of this as usual is sourcing the best and freshest produce that you can. This is especially the case with anything like quick cures and tartares where the fish isn’t fully cooked, and I wouldn’t dream of using something packaged for days in a supermarket for this. On this occasion I went to the excellent Jonathan Norris in Victoria Park village, and managed to buy a lovely piece of salmon for a very reasonable price. Supporting local independent food shops is important in keeping our high streets interesting, and means that we can have a much more varied choice of better quality, seasonal ingredients than what would be found in a supermarket. If these kind of shops are a little far from home or you don’t have the time, check out Hubbub, a shopping service that visits these amazing producers and delivers to your door.

Serves 2.

Ingredients:

2 nice pieces of salmon loin, ideally cut from the lean top of the fillet, around 2” thick

For the beetroot cure:

2 beetroots, peeled and roughly chopped
10 thyme sprigs
2 garlic cloves, skin removed
2 bay leaves
100g salt
50g sugar

For the smoked salmon pate:

100g smoked salmon
2 spring onions, white end only (save the green middle for the tartare)
1 lemon, juice only
2 tbsp double cream
Salt and pepper

For the salmon tartare:

1 tbsp fresh tarragon leaves, very finely chopped
1 tbsp green part of the spring onions
1/2 lemon, juice only
1 tbsp extra virgin olive oil
Salt and pepper

For the horseradish cream:

4 tbsp creme fraiche
2 tbsp finely grated horseradish
1 tsp english mustard
1 tsp white wine vinegar
1 lemon, juice
Salt and pepper

For the pickled radishes:

4 baby radishes, finely sliced
4 tbsp white wine vinegar (or to cover chopped radishes)
1 lemon, juice
Salt and pepper

To finish:

Peashoots or baby watercress
Warm crusty bread and butter
1 tbsp extra virgin olive oil

Cure one of the salmon loins the day before you want to eat. To do this, put the beetroot, thyme, garlic, bay, salt and sugar into a food processor and blitz well until the mixture is very smooth and runny. Tip this into a small but deep tray and add the salmon, carefully making sure that it gets a good amount of the cure all over before covering the tray and putting in the fridge. Turn the salmon over after about 10 hours and put back in the fridge for another 10. After this time, the salmon will have firmed up a little and will have taken on the bright red beetroot colouring. Wash off the cure mixture and dry on kitchen paper. The cured salmon is now ready to use, and will last a good few days in the fridge at this point. 


To quickly pickle the radishes, slice them very thinly and put into a bowl. Cover with a little salt, pepper, the juice of a lemon and enough white wine vinegar to cover. Leave for at least half an hour for them to soften slightly and go almost translucent. 


For the horseradish cream, put the creme fraiche into a bowl and add the horseradish, mustard, white wine vinegar, lemon and a little seasoning. Mix well and taste, adding more horseradish, lemon or seasoning as needed. Set aside. It is fine to use as it is, but the flavours will get better the longer they can develop, ideally overnight. 


Heat the oven to 200ºC. Put a piece of greaseproof paper onto a baking sheet and place the reserved salmon skin on top. Drizzle over a little oil and seasoning, place another piece of paper on top, followed by another baking sheet. This will keep the skin flat as it cooks. Cook for 8-10 minutes, or until the skin is golden and crispy. Allow to cool and then cut into shards with a sharp knife.


To make the smoked salmon pate, put the spring onion, a little seasoning and the lemon juice into a food processor and blitz until very finely chopped. Add the smoked salmon and blitz again until it is a smooth pate texture. Add the double cream mix a final time until the mixture is a little lighter. Taste and season. 

Make the salmon tartare last of all. Cut the second piece of salmon into small even dice and put in a bowl. Add the finely chopped spring onion and tarragon and mix well. Squeeze over the juice of half a lemon and pour over the extra virgin olive oil. Mix again, taste and season if necessary.


To plate up, slice 3 thin slices of the cured salmon and arrange in the middle of the plate. Add a small pile of the tartare on one side and a quenelle of the pate on the other, poking a piece of crispy salmon skin into the centre. Spoon some horseradish cream around the salmon, add a few pickled radishes and a couple of peashoots (or watercress, if using). Serve with some warm bread and butter and a glass of dry white wine.

Monday 12 November 2012

Pea, mint and almond tortellini with black pudding, crispy bacon and peashoots


Another day, another pasta recipe... I really am addicted to pasta, and could make and eat every day of the week. In this country is has a stereotypical association with stodgy student food, but it is so much more than that! With a little thought, you can make a lovely pasta dish out of pretty much anything that you’ve got in the fridge; and that’s exactly what I did with this recipe. 

Normally I leave making fresh pasta for weekends, or when I have a bit of time to cook something nice. It’s something that I like not to rush, and although with a bit of practice it’s quick to make, I find that taking my time with it makes the whole process lovely and therapeutic. On this occasion, I had made a batch of pasta a week before for a dinner party, and froze the cricket ball sized leftover dough. I didn’t really have a plan for it at the time, but it was too good to waste and definitely came in handy. All I had to do was take it out of the freezer the night before and it was all ready to roll out when I got home from work. 


I fancied making filled pasta again, and what I had in my fridge and freezer left me in no doubt as to what I wanted to put in it (or basically that was all I had in so had very little choice...). I had some peas in the freezer, and some bits left over from a previous breakfast and thought that they 
 go well together. Peas with bacon or black pudding is quite a classic combination with things like scallops or liver, so I was sure that it would work here too. Perhaps unsurprisingly it did, with the fresh and zesty peas contrasting beautifully with the salty bacon and the earthy black pudding. 

The best thing about it is that it is so easy to put together, and if you already have the pasta dough made then it’s so quick. Perfect for that night after work where you fancy something tasty but can’t really be bothered. For vegetarians, the basis of this recipe can remain the same, but the bacon and black pudding can be substituted with a nice tangy hard goat's cheese.

Serves 2

Ingredients:

For the pasta:

200g 00 Flour
2 medium eggs
1 tsp olive oil
Salt and pepper

For the filling:

250g frozen peas
125g good ricotta cheese
1/2 bunch mint leaves
2 spring onions, chopped
1 garlic clove, finely chopped
2 tbsp ground almonds
2 tbsp finely grated parmesan
1 lemon, juice only
Salt and pepper

For the butter sauce: 

80g butter
3 slices of bacon, chopped into small pieces
Salt and pepper

To finish:

6 slices of black pudding 
1 handful peashoots
1 tbsp finely grated parmesan

First make the tortellini filling. Saute the spring onion and garlic until softened and add to a food processor with the ricotta, mint, ground almonds, parmesan, lemon juice and seasoning. Heat up a small saucepan of water until boiling and add the peas. Cook for a couple of minutes until tender and sweet before draining. Run the peas under cold water to stop the cooking and leave to dry off for a couple of minutes (tipping onto kitchen paper speeds this up). Add most of the peas to the food processor and blitz everything together until smooth. Taste and adjust the seasoning and lemon, then stir in the few remaining peas for a bit of texture. Set aside until you are ready to fill the pasta.


Now make the pasta. Put the flour, eggs and a good pinch of salt in a food processor, and blitz until the mix looks like coarse breadcrumbs. Tip everything out onto a floured surface and knead together until the dough has an elastic texture but is not sticky. Knead in a little flour if necessary. Wrap in cling film and put in the fridge for half an hour to rest.


After half an hour, remove the pasta dough from the fridge. Using your pasta machine, roll the dough until it goes through the thinnest setting and you have a long, almost translucent sheet. Cut the pasta into 4” squares on a well floured surface, and spoon a large tablespoon of the filling into the middle of each square. Brush a small amount of water onto one half of the pasta sheet, and carefully fold diagonally to form a triangle with the pocket of filling sealed in. As you fold, push out any air that is trapped inside. Using a pastry cutter, cut around the folded triangles to make little neat semicircles. Holding one semicircle in one hand, gently form a dimple in the middle with your thumb and wrap the two corners around your thumb, then sealing with a little water. Sprinkle with a little flour and set aside in the fridge on some greaseproof paper until needed. Repeat until you have 6 tortellini (3 per person).


Heat up a saucepan on a medium-high heat with a little olive oil, and fry the bacon pieces until crispy. Remove and set aside, and remove any excess oil from the pan but do not clean. 


Fill a saucepan with water, season with salt and bring to the boil. 

While the water is boiling, cook the black pudding. Carefully cut the slices so that they are just bigger than the tortellini. Save the other bits to add to breakfast. Heat a non-stick frying pan with a little olive oil on a medium heat. Fry the black pudding for 3 minutes per side. 

Heat up the saucepan used for the bacon to a medium-high heat and add the butter. When the butter turns a light brown colour and is foaming, add the crispy bacon bits. Taste and season.

When the water has boiled, and the black pudding and butter sauce have 2 minutes to go, put the tortellini into the boiling water. Cook for 2 - 2 1/2 minutes before carefully removing with a slotted spoon. 

To plate up, arrange the black pudding on the plate and top each one with a tortellini. Spoon over a good amount of the bacon butter sauce, sprinkle with parmesan and finish with some peashoots.